← Back to Knowledge Base
business and technology5 min read

How to connect WordPress Forms to Zoho CRM via Zoho Flow — a step-by-step guide

7 simple steps to connect WordPress forms to Zoho CRM without writing code — every lead from the website automatically goes to CRM

May 26, 2026
How to connect WordPress Forms to Zoho CRM via Zoho Flow — a step-by-step guide

Key Takeaways

  • 1Connecting WordPress Forms to Zoho CRM via Zoho Flow requires no code writing — just a webhook and field mapping.
  • 2The webhook created by Zoho Flow works with WP Forms, Contact Form 7 and most WordPress form plugins.
  • 3Correct field mapping is the critical step — the contact name, email and phone number must go to the correct fields in CRM.
  • 4Once activated, any form submitted from the website automatically becomes a lead in Zoho CRM — without manual intervention.

If your website is built on WordPress and you manage leads in Zoho CRM, you're probably entering data manually—or you're missing out on leads. In this guide we will see how to connect WordPress forms directly to Zoho CRM through Zoho Flow, in 7 steps that do not require writing code. Every lead sent from the website automatically arrives in the CRM — with all the details, in real time.

Step 1 — Log in to Zoho Flow

Go to flow.zoho.com. Zoho Flow is Zoho's automation platform that connects different applications — inside and outside the Zoho ecosystem. If you are a Zoho One user, Flow is included in the package at no additional cost.

Step 2 — Create a new flow

In the right corner click on NEW FLOW. Choose Create From Scratch and give Flow a name - a descriptive name like 'WordPress Lead to Zoho CRM' is recommended so that it is easy to identify in the future.

Step 3 — Define the trigger (Webhook)

Click on Trigger and select Webhook. The system will generate a unique URL that serves as the entry point for all information sent from WordPress. Save this URL — you'll need it in the next step. For example: https://flow.zoho.com/webhook/incoming?zapikey=XXXXX

Step 4a — go to edit the form in WordPress

After you have configured the webhook in Zoho Flow, go to WordPress and go to edit the relevant form.

Step 4b — Navigation to the webhook settings in WP Forms

Inside the form go to Settings → Integrations → Webhooks.
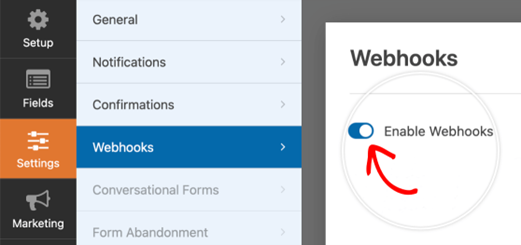
Step 4b — Navigation to the webhook settings in WP Forms

Step 4c — Paste the URL and save

Paste the Webhook URL you received from Zoho Flow and save. From now on every form submission will send the information directly to Zoho Flow.
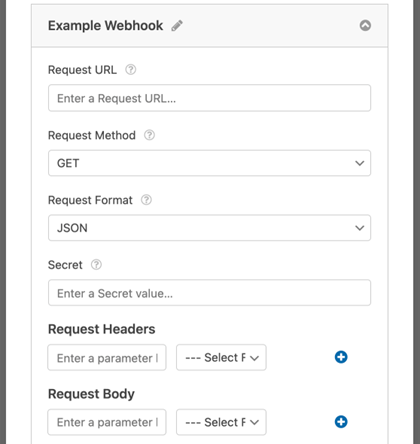
Step 4c — Paste the URL and save

Step 5 — check that the information arrives

Return to Zoho Flow and click on Test Flow. Send a trial form from the website and check that the data has arrived and been correctly entered. This is a critical step — do not proceed with defining the operation before confirming that the information arrives in a normal form.

Step 6a — Choose the action in Zoho Flow

In the menu on the left, choose ACTION. Select Zoho CRM as the target application, then the action Create Record — Lead.
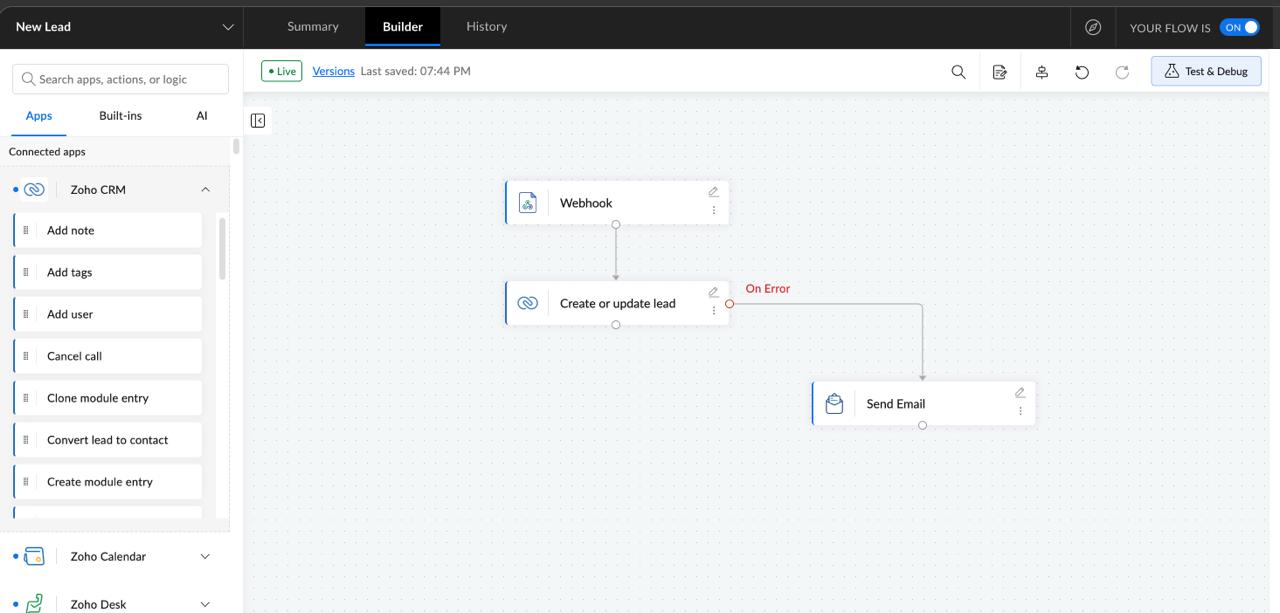
Step 6a — Choose the action in Zoho Flow

Step 6b — Map the fields to Zoho CRM

Map the fields from the form to the corresponding fields in the lead card in CRM: applicant's name, email and phone. It is important to make sure that every mandatory field in CRM receives a value - otherwise the lead will not be created.
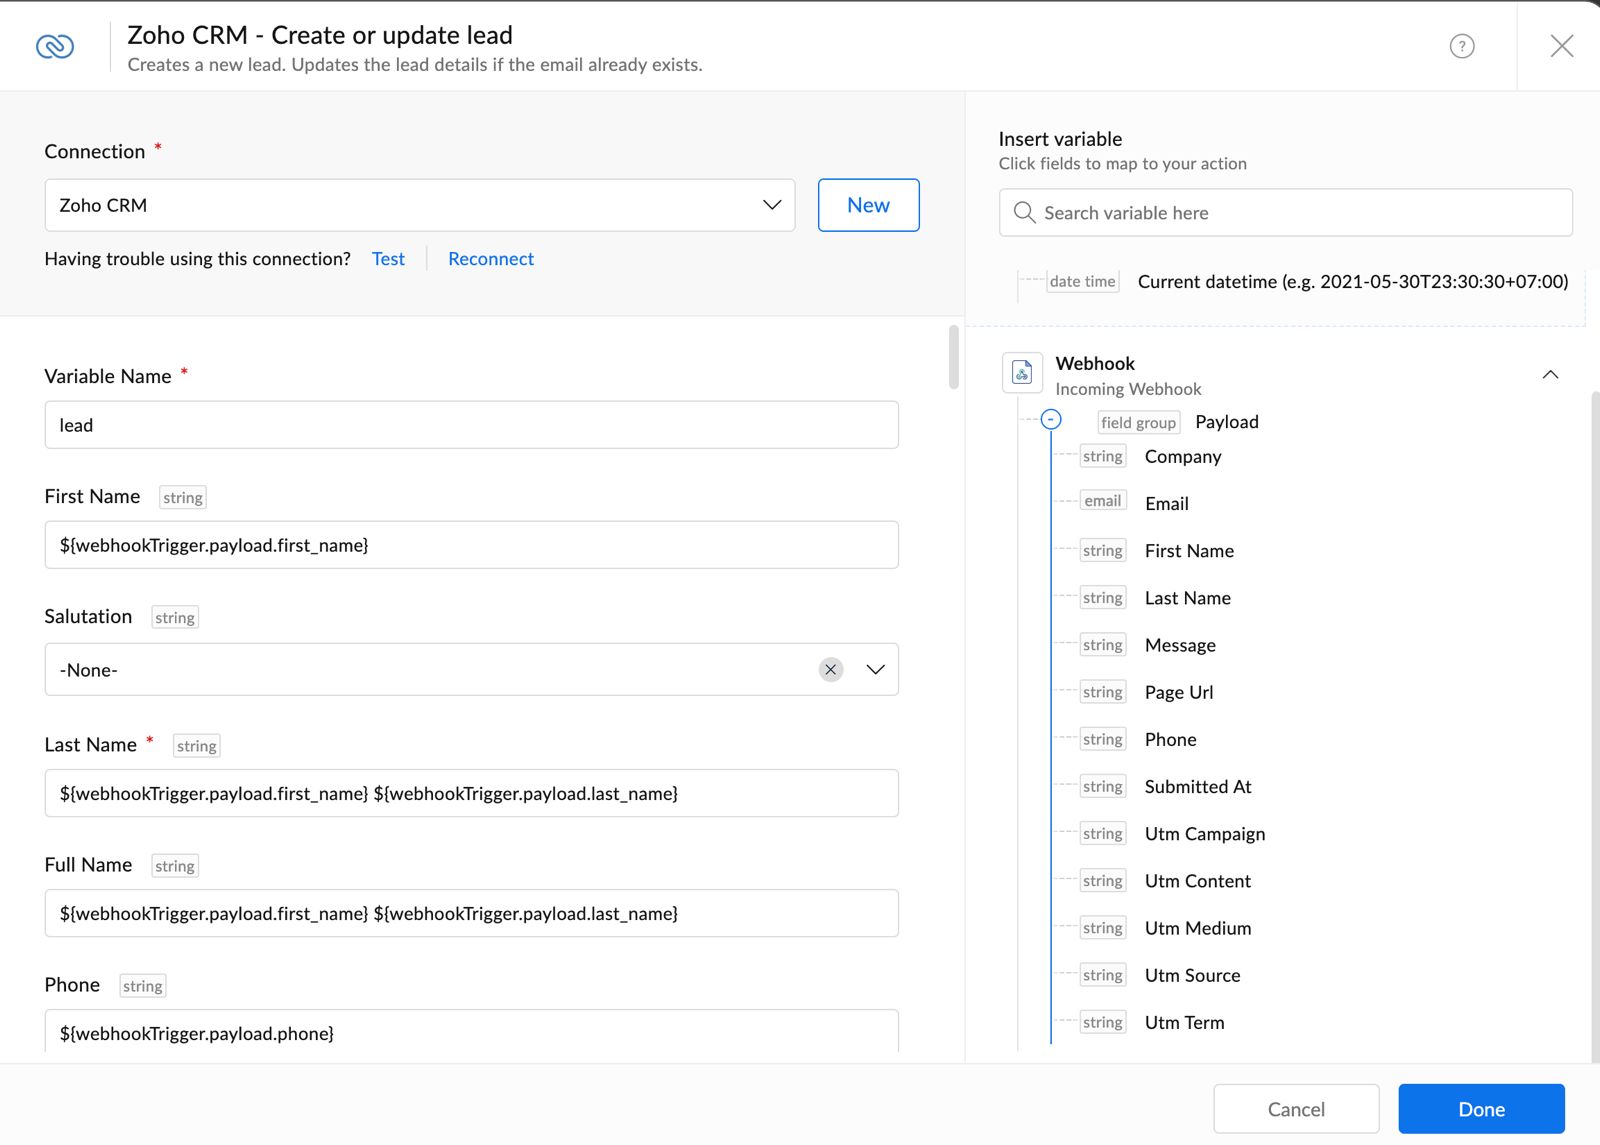
Step 6b — Map the fields to Zoho CRM

Step 7 — Activate and test

Click Turn On and then SAVE. The fluo is active. Send a real lead through the form on the website and check that it arrived in Zoho CRM with all the correct details. From now on, every contact through the form will create an automatic lead in CRM - without the need for manual intervention.

Conclusion

The 1T Solutions team connects WordPress systems to Zoho CRM and implements lead automation for businesses in Israel - with projects at a fixed price and full support in Hebrew. Contact us for a free characterization call.


#Zoho Flow#WordPress#Zoho CRM#Zoho Israel#Lead automation#Webhook#small and medium businesses

רוצים להפוך את הידע הזה למערכת שעובדת?

ב־1T Solutions אנחנו מתכננים ומטמיעים מערכות שמחברות בין העסק, הצוות והטכנולוגיה.

Frequently Asked Questions

not. The whole process is based on a visual interface — creating a Webhook, pasting a URL in WordPress and mapping fields in Zoho Flow. No programming knowledge, PHP, JavaScript or direct API required.

Zoho Flow works with any plugin that supports sending Webhooks — WP Forms, Contact Form 7, Gravity Forms, Elementor Forms and more. If your plugin does not have built-in support for webhooks, you can use dedicated WordPress plugins that add this capability.

The most common problems: the flow was not activated (step 7), the webhook URL was not correctly pasted into WordPress, or incorrect field mapping that causes a required field to remain empty. In Zoho Flow you can see the history of the runs and identify exactly where the process stopped.

yes. You can create a separate flow for each form - or one flow with branched logic that identifies which form the request came from and handles it accordingly. For example: the 'Contact Us' form creates a lead, the 'Webinar Registration' form creates a lead with a specific tag.

Both can make the connection. The advantage of Zoho Flow: included in Zoho One at no additional cost, the integration with Zoho CRM is more native and stable. Zapier advantage: a wider range of integrations with external tools. For businesses already on Zoho One — Zoho Flow is the obvious choice.

yes. Zoho Flow is included in the Zoho One package at no extra charge. For businesses that pay for Zapier separately, switching to Zoho Flow is a direct savings—especially as the volume of automation increases.

For those who know the tools - 15 to 30 minutes. For the first time, with the tests, about 45-60 minutes. The step that takes the most time is usually the mapping of the fields — you should verify in advance what the field names are in the WordPress form and what the field names are in Zoho CRM.

Interested in more details?

Talk With Us!